So you have a WordPress website that takes a bit too long to load. You ran a speed test at Google PageSpeed, GTMetrix, or Pingdom, and found you have a lot of room for improvement. You’re probably concerned about high bounce rates, and you fear Google penalizing your search rankings because of high page load times.
You are right to be concerned. Page load speed is VERY important to user experience and SEO (search engine optimization)!
I’ve been down this road, too. But in my case, I’ve been an expert web developer for about 20 years, so I have the experience and know the secrets to drastically improve page load performance.
I not only know how to implement these solutions, but I’ve done it so many times that I have it down to a science.

Luckily for you, I’m here to share with you my 5 simple steps to speed up WordPress. In a matter of minutes, we’ll have your website loading lightning fast so you can start moving up the SEO ranks!
Why You Need to Improve Your Page Load Speed
People like fast websites. Because of that, Google likes fast websites. They’ve made it perfectly clear many times over the years that they are heavily weighting page load speed as a key factor in their search engine ranking algorithms.
If you want to increase your chances of getting ranked highly in Google’s SERPs (Search Engine Results Pages) and start getting lots of organic search traffic on an ongoing basis, you’ve got to get your pages to load as fast as possible.
Google has said that your average speed index should be under 3 seconds.
How to Speed Up WordPress Performance
WordPress gets a bad rap sometimes. I’ve heard people say “WordPress is slow”. Ugh…
That’s a bit unfair to say because WordPress is an open source platform with an enormous ecosystem of free themes and plugins. That coupled with the fact that WordPress is so easy to deploy for DIY website owners, means there are a lot of poorly made WordPress sites out there on the Internet. No offense if yours is one of them… I’m here to help you.
Now, without further ado, follow these 5 steps on your WordPress site to make it load super fast.
1) Optimize Images
One of the biggest causes of slow page load times are huge uncompressed images. I’ve seen this clients upload 17MB images onto their website and wonder why it was loading so slow!
Luckly, you don’t have to manually download, resize, compress, and re-upload all of your images. For many sites, that would take forever.
Instead, since we’re using WordPress, we can use a plugin to easily compress all of the images that have been uploaded to the Media Gallery all at once.

To use EWWW to optimize your WordPress images:
- Search for the EWWW Image Optimizer plugin, install it, and activate it.
- Without even messing with the default settings, go to Media > Bulk Optimize and run it.
- That’s it! Leave the page open until it finished processing all of your images.
Notes:
- This uses lossless compression by default, so you shouldn’t notice any difference in image quality
- It compresses all of the various image sizes that you have configured in your WordPress
Once EWWW finishes, you should be able refresh the front-end of your site to find your images have smaller file sizes and load faster.
How to Test Load Times of Images (and Other Assets)
This is a great time to show you how to use the your browser’s dev tools to actually see what’s happening behind the scenes.
Since your browser is caching the images on your site, you probably won’t even notice any difference in page load speed even with huge images. But, if you clear your cache or hard refresh, you should see how slow it would load if it was the first time you visited the site.
To Hard Reload (or Force Refresh) in Chrome, you can press Ctrl+Shift+R or click and hold on the refresh button to get this menu…

Now, to the dev tools…
To see the large assets that are slowing down your site:
- Press F12 to open your browser’s dev tools panel. In this example, we’re using Chrome.
- Click on the Network tab at the top.
- Hard Reload the web page (see above).
- You should now see all the assets that your web page loads.
- Click on the Size column to sort by size.
- Look for the biggest files at the bottom.
- If you hover over a file, you can see the full path to that file.

Finding Unoptimized Images
Using the method above, you should be able to identify any culprits, meaning large images that didn’t get optimized. You might find that these images are not coming from /wp-content/uploads/… If they were, then they should have been compressed by EWWW.
If images are found that are not in /wp-content/uploads/… then something is including those images without involving them in the WordPress Media Gallery which means EWWW did not optimize them. Sometimes custom-built themes might have images baked into their theme, and plugins could be doing the same thing. Viewing the full path to those large images should reveal which plugin or theme they’re coming from.
EWWW Image Optimizer has another setting to scan folders that you specify to find images to optimize.
- Go to Settings > EWW Image Optimizer > Advanced Settings
- Check the boxes for Scheduled Optimization and Include Media Library Folders
- Enter the path to your theme in the Folders to Optimize

Resize Large Images
You may find a large image that is loading in a small part of the page. GTMetix and other tests will show you images that should be resized.
It doesn’t matter if it was compressed, if it’s a 1920 pixel wide image that you are displaying on the page as a 300 pixel wide image, the browser is having to load the big version just to shrink in down in the HTML.
Luckily WordPress makes it easy with various image sizes already available to use. Make sure to pick the appropriate image size and not always use “Full Size”.
2) Browser Caching and Gzip Compression
The next step is to edit your .htaccess file to enable features like browser caching and gzip compression.
WARNING: Editing the .htaccess file is always risky. One mistake, and it will take down your entire website with a “500 error” until it is fixed. Please take a backup copy of your .htaccess file in case you need to quickly revert.
Here is the code that you can drop into the top of your .htaccess file…
# Use UTF-8 encoding for anything served text/plain or text/html
AddDefaultCharset UTF-8
# Force UTF-8 for a number of file formats
<IfModule mod_mime.c>
AddCharset UTF-8 .atom .css .js .json .rss .vtt .xml
</IfModule>

# FileETag None is not enough for every server.
<IfModule mod_headers.c>
Header unset ETag
</IfModule>

# Since we’re sending far-future expires, we don’t need ETags for static content.
# developer.yahoo.com/performance/rules.html#etags
FileETag None

<IfModule mod_alias.c>
<FilesMatch "\.(html|htm|rtf|rtx|txt|xsd|xsl|xml)$">
<IfModule mod_headers.c>
Header unset Pragma
Header append Cache-Control "public"
Header unset Last-Modified
</IfModule>
</FilesMatch>

<FilesMatch "\.(css|htc|js|asf|asx|wax|wmv|wmx|avi|bmp|class|divx|doc|docx|eot|exe|gif|gz|gzip|ico|jpg|jpeg|jpe|json|mdb|mid|midi|mov|qt|mp3|m4a|mp4|m4v|mpeg|mpg|mpe|mpp|otf|odb|odc|odf|odg|odp|ods|odt|ogg|pdf|png|pot|pps|ppt|pptx|ra|ram|svg|svgz|swf|tar|tif|tiff|ttf|ttc|wav|wma|wri|xla|xls|xlsx|xlt|xlw|zip)$">
<IfModule mod_headers.c>
Header unset Pragma
Header append Cache-Control "public"
</IfModule>
</FilesMatch>
</IfModule>

# Expires headers (for better cache control)
<IfModule mod_expires.c>
ExpiresActive on

# Default expiration
ExpiresDefault                          "access plus 1 month"

# cache.appcache needs re-requests in FF 3.6
ExpiresByType text/cache-manifest       "access plus 0 seconds"

# Your document html
ExpiresByType text/html                 "access plus 0 seconds"

# Data
ExpiresByType text/xml                  "access plus 0 seconds"
ExpiresByType application/xml           "access plus 0 seconds"
ExpiresByType application/json          "access plus 0 seconds"

# Feed
ExpiresByType application/rss+xml       "access plus 1 hour"
ExpiresByType application/atom+xml      "access plus 1 hour"

# Favicon (cannot be renamed)
ExpiresByType image/x-icon              "access plus 1 week"

# Media: images, video, audio
ExpiresByType image/gif                 "access plus 1 month"
ExpiresByType image/png                 "access plus 1 month"
ExpiresByType image/jpeg                "access plus 1 month"
ExpiresByType video/ogg                 "access plus 1 month"
ExpiresByType audio/ogg                 "access plus 1 month"
ExpiresByType video/mp4                 "access plus 1 month"
ExpiresByType video/webm                "access plus 1 month"

# HTC files  (css3pie)
ExpiresByType text/x-component          "access plus 1 month"

# Webfonts
ExpiresByType application/x-font-ttf    "access plus 1 month"
ExpiresByType font/opentype             "access plus 1 month"
ExpiresByType application/x-font-woff   "access plus 1 month"
ExpiresByType application/x-font-woff2  "access plus 1 month"
ExpiresByType image/svg+xml             "access plus 1 month"
ExpiresByType application/vnd.ms-fontobject "access plus 1 month"

# CSS and JavaScript
ExpiresByType text/css                  "access plus 1 year"
ExpiresByType application/javascript    "access plus 1 year"

</IfModule>

# Gzip compression
<IfModule mod_deflate.c>
# Active compression
SetOutputFilter DEFLATE
# Force deflate for mangled headers
<IfModule mod_setenvif.c>
<IfModule mod_headers.c>
SetEnvIfNoCase ^(Accept-EncodXng|X-cept-Encoding|X{15}|~{15}|-{15})$ ^((gzip|deflate)\s*,?\s*)+|[X~-]{4,13}$ HAVE_Accept-Encoding
RequestHeader append Accept-Encoding "gzip,deflate" env=HAVE_Accept-Encoding
# Don’t compress images and other uncompressible content
SetEnvIfNoCase Request_URI \
\.(?:gif|jpe?g|png|rar|zip|exe|flv|mov|wma|mp3|avi|swf|mp?g|mp4|webm|webp)$ no-gzip dont-vary
</IfModule>
</IfModule>

# Compress all output labeled with one of the following MIME-types
<IfModule mod_filter.c>
AddOutputFilterByType DEFLATE application/atom+xml \
                                application/javascript \
                                application/json \
                                application/rss+xml \
                                application/vnd.ms-fontobject \
                                application/x-font-ttf \
                                application/xhtml+xml \
                                application/xml \
                                font/opentype \
                                image/svg+xml \
                                image/x-icon \
                                text/css \
                                text/html \
                                text/plain \
                                text/x-component \
                                text/xml
</IfModule>
<IfModule mod_headers.c>
Header append Vary: Accept-Encoding
</IfModule>
</IfModule>
This is the code that the WP Rocket plugin installs into your .htaccess file automatically. You should be able to use it without WP Rocket, but I do recommend buying WP Rocket since it will automate this feature and will take care of all of the below steps very easily.
3) Minify, Combine, and Defer Javascript and CSS
When you install WordPress plugins, each one usually comes with its own set of CSS files and Javascript files that it enqueues into the front-end of your website. When you have lots of WordPress plugins running on your site, all of these separate files will increase your number of HTTP requests and slow down your page load speed.
The fix is to use a plugin to minify and combine your Javascript and CSS assets. These plugins also usually have a feature to defer the loading of render-blocking javascript.
I’ve tried a lot of different plugins on a lot of different websites, and my absolutely favorite by far is WP Rocket. It is a paid plugin, but totally worth it in my opinion.
However, if you really want to stick to free plugins only, one that worked pretty well for just this feature is Fast Velocity Minify.
4) Static HTML File Caching
The idea behind WordPress caching is this. When someone loads a page on the front-end, the caching plugin takes a snapshot of the HTML that was outputted by WordPress and delivered to the user. The caching plugin takes that snapshot and stores it in a static HTML file inside the /wp-content/cache/ folder. The next time someone visits that same page, the caching plugin bypasses the normal process of letting WordPress core query the database, load all of the plugins, and build the HTML using all of the theme’s template files. Instead, the caching plugin serves the cached HTML file directly. This eliminates a ton of CPU load on your server and drastically increases the “time to first byte” measurement in page speed scores.
There are lots of WordPress caching plugins, but again, I’ve found that WP Rocket works the best. Right out of the box, it automatically applies 80% of web performance best practices. You can go through the settings to refine its behavior.

WP Fastest Cache and my Issues with it
A free alternative is the WP Fastest Cache plugin.
However, if you are using a different plugin like Fast Velocity Minify to handle minifying and combining JS and CSS, then you might have issues. You would need to use WP Fastest Cache without any minify or combine settings enabled.
I used to swear by those two plugins until one day WP Fastest Cache released an update that decided that they would no longer play nice with minification plugins, but you couldn’t make WP Fastest Cache do everything that Fast Velocity Minify was doing without purchasing the Pro version. That dirty tactic to try and force people to start paying for their plugin put a bad taste in my mouth. Plus, WP Fastest Cache didn’t have any licenses available for unlimited sites. Working for an agency, we definitely didn’t want to pay for each site individually.
5) CDN Caching with Cloudflare
The last step which really makes a huge difference is CDN (Content Delivery Network) caching. CDN caching works by replicating your site assets (and even HTML) onto the CDN which then replicates that content across its global network of servers. This helps average page load speeds tremendously by serving your site and its assets all over the world from servers that are near the users.
Cloudflare is an absolutely amazing CDN and it’s completely free to get the basic features that you need. You can upgrade for more bells and whistles, but the free version is all I use, and it’s staggeringly powerful by itself.
To get set up on Cloudflare:
- Go to Cloudflare.com
- Click “Sign Up” fill out the forms to sign up for a free account
- Click “Add Site”
- Enter your domain name
- Select a plan (free is great at least to start off with)
- Review your DNS records (usually, you’re good to leave it alone)
- It will give you 2 nameserver addresses. Login to your domain registrar, edit your domain settings, and change the nameserver settings to the ones provided by Cloudflare.


After you change your nameservers on your domain, if you refresh your site and find an SSL error and you previously already had an SSL certificate that was working…
- Login to your Cloudflare dashboard
- Go to the Crypto tab
- Set SSL to “Full (strict)”
- Your site should now be working

How to Minify and Cache on Cloudflare
Now that you’re all setup on Cloudflare, you probably already notice how much faster your site is loading. But now, let’s dig into the features that will make your site even faster!
To enable Cloudflare’s Auto Minify feature:
- Go to the Speed tab
- Under Auto Minify, check all 3 boxes (Javscript, CSS, and HTML)

Note: I do not recommend using Cloudflare’s Rocket Loader feature only because I’ve found that to be the cause of website problems so many times with clients’ websites. Plus, if you’re using the WP Rocket plugin, you’re deferring your javascript anyway which should have the same end result.
How to Enable HTML Caching on Cloudflare
Just so you know, Cloudflare automatically starts caching static assets like images, CSS, and javascript files. With those alone being cached, you will see a big performance boost. But, did you know you can even cache your HTML so the entire web page is loaded from Cloudflare’s CDN instead of your web server (unless the cache expires or you’re logged in)?
To enable Cloudflare’s HTML Caching Feature:
- Go to the Page Rules tab
- Add at least the 1st and 3rd rule as shown below.

Let me explain what each of these rules are doing…
Cloudflare Page Rule #1 for WordPress = Admin Area
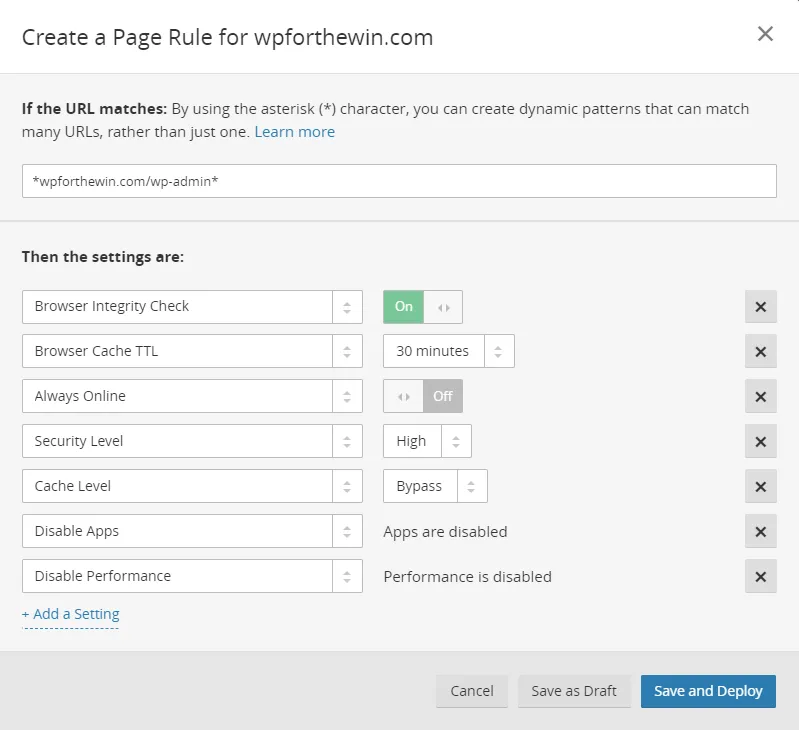
Rule #1 is for the WordPress admin area. Asterisks are used at the beginning of the domain to account for possible use of www and at the end of wp-admin/ so that any page in the admin area will be covered by this rule.
All of the settings under this rule are increasing security and disabling caching so as to avoid issues when working in the WordPress dashboard.
Cloudflare Page Rule #2 for WordPress = Front-end Pages Without HTML Caching

This one is optional. In my case, I have a forum under the slug of /question. Since the forum accepts user-generated content which should change after submitting a new comment, I could not let these pages fall into rule #3 or they wouldn’t update. Also, those comment forms have “nonces” which are security tokens handled by WordPress. You can’t cache pages with nonces on them otherwise only one person will be able to fill out the form, and after that everyone else will get an error.
Also, notice how asterisks are before and after the word “question”? I did that so I could make any page fall into this rule simply by adding the word “question” anywhere in the slug.
This was handy because Cloudflare limits you to only 3 rules on the free plan, and this method gave me some flexibility in using Rule #2.
Cloudflare Page Rule #3 for WordPress = Cache Everything!

Here is where the HTML caching magic happens! Rule #3 is for the rest of the front-end of the website that does not fall into Rule #1 or Rule #2.
Here we increase the Browser Cache TTL to 8 days (you can change it to something else if you want).
But, the important setting here is “Cache Level: Cache Everything” which means we’re not only caching static assets like the “Standard” cache level, but we’re also going to cache the HTML of the pages!
Note About Cloudflare’s Cache Everything and the WordPress Admin Bar
When I was first learning about Cloudflare, I followed someone else’s tutorial that told me to enable the setting “Edge Cache TTL”. DON’T!
When you enable Cache Everything along with Edge Cache TTL on a WordPress site that has a front-end admin bar when you’re logged in, it will cache the HTML of logged-in users as well as visitors. The first one to a new page got to cache it the way they saw it. That means visitors to my website were seeing pages with an admin bar on it with my name and avatar in the corner!!!
It took me forever to realize that Edge Cache TTL was causing this problem. I found out that by simply removing that rule, Cloudflare respects headers and therefore won’t cache pages while you’re logged in.
Let’s Hear From You
What do you think about these steps? Did you find them helpful? I would love to hear from you in the comments below!
Having any issues? I also love to help people out. Let me know in the comments. Thanks!
Related Posts:
")


Blogger, expert WordPress developer, and developer of the awesome bbPress Voting plugin which is a must-have plugin for any bbPress forum.
Download bbPress Voting for free on the WordPress Plugin Directory.
Great article Nathan, really like your tips around using Cloudflare’s page rules. I’ve seen similar suggestions recently, but yours seem to work the best. We also use WP Rocket + Cloudflare. Thanks to your tips, we’re on PageSpeed Score (85%) YSlow Score (67%). Not the fastest site out there but I’m sure our visitors will appreciate the speed boost.
Awesome! I’m glad you liked it and it worked well for you!
Thank you so much! This is awesome!